
How to upload your first game build to Steam
My easy method for anyone to manage Steam builds

Publishing your first game on Steam can be confusing. I went through several different approaches when I worked on my first game until I landed on one that I thought worked well. I'm writing this guide to help you easily publish your games and set you up with a simple workflow you can use in the future.
For this guide, let's assume you already have a store page. Note that you do not have to have a build uploaded in order to publish your store page! That confused me a little at first so I want to make that extra clear for you all.
Getting Started
We'll be using the Steamworks SDK to upload your builds. You can upload a .zip directly if your build size is small, but I think the method I'm about to show you is both easier and can be automated.
Log in to your Steamworks account, which should bring you to your dashboard (this link should take you there). Scroll down to find the Steamworks download button. It looks like this:

You can save this wherever you like, but I like to save the specific Steamworks SDK to my project repo, at the root level. This keeps everything in the same place and let's you lock and intentionally manage the SDK version for a specific game.
Package your build
While you're waiting on the download, you can package the build that you want to publish. How you package the build depends on your engine. For example, in Unreal Engine 5, I use the Platforms context menu. Generally speaking, I don't have to change anything for it to work.

We'll handle the build dependencies in a later step when setting the build up in Steampipe, the Steamworks distribution and build management tool.
Setting up the Steamworks GUI
Yes, you read that right. There is a GUI packaged within the Steamworks SDK which you can use to generate the appropriate files to run your builds. I found out about this after doing it manually several times. Isn't that handy to know about?
Unzip the Steamworks SDK and navigate to:
BASE_PATH\steamworks_sdk_161\sdk\toolswhere BASE_PATH is the path that you unzipped the folder to. We'll be working out of two of these folders later.
Note that the exact name of the folder will change based on the Steamworks SDK version. For version 16.1 it uses the 161 folder as above.
Unzip the SteamPipeGUI
Find the SteamPipeGUI` .zip and extract it. Just accept the default which should place it in
BASE_PATH\steamworks_sdk_161\sdk\tools\SteamPipeGUIUpdate the Steam CLI tool
Assuming you're on Windows, run the `steamcmd` application to auto-update the tool. It's here n the 16.1 version:
BASE_PATH\steamworks_sdk_161\sdk\tools\ContentBuilder\builder/steamcmdOpen the GUI
Head to where you unzipped the SteamPipeGUI and start the app. It should open and show something like this

You can go a lot from this GUI, but I use it to generate the VDF files which steamcmd uses to upload builds. Once I generate those, I don't open the GUI again and instead use a script that I'll show you later.
For now, go ahead and enter your
Steam App ID
Steam Login
Steam Password (you can choose to save it or not)
Now, Use the Browse tool to browse to the path of the ContentBuilder folder. If you've followed along with my setup, it's at
BASE_PATH\steamworks_sdk_161\sdk\tools\ContentBuilderSteamworks Dashboard Setup
In order to generate the VDFs, you'll need to add at least one "Depot". This is Steam's word for a single environment under which your builds are stored.
You'll need to setup a depot on your Steamworks Dashboard. It should look like this

Use the Add New Depot button to create and configure a new one.
While you're here, let's set up two more things. First, the libraries that players need to install and run your game on their computer. For example, with my game built with Unreal 5.3, I choose these

If you don't know what values to pick, consult the documentation for your engine of choice.
Next, tell Steam where the executable for your game should be. At time of writing, you do that under the General Installation tab on the Steamworks Dashboard for your game.

For my game, Trace Hunters, the install folder is simply Trace Hunters. Similarly the executable is located at Trace Hunters/Windows/TraceHunters.exe. You get this path from the package for your build that we'll place in the Steamworks SDK content folder in later steps. The path will also depend on the engine that you use.
Generate your build scripts
Great, now that everything is set up let's create some VDFs! Go ahead and click Generate VDFs button. If everything was configured correctly it should generate a several .vdf files which the steamcmd cli can use to upload your build.
Your VDF files will be created here once the tool finishes running.
BASE_PATH\steamworks_sdk_161\sdk\tools\ContentBuilder\scriptsCreate and run the build script
Now, instead of using the GUI each time to upload your build we're going to create a simple script. Open your favorite text editor and paste in the following:
builder\steamcmd.exe +login YOUR_LOGIN +run_app_build ..\scripts\app_2806170.vdf
Replace YOUR_LOGIN with the login name for your Steamworks account. If you chose not to save your password, you'll also need to add a +password YOUR_PASSWORD statement to the script after the login statement.
I save these files into the ContentBuilder folder
BASE_PATH\steamworks_sdk_161\sdk\tools\ContentBuilderand name them based on the type of build. My demo build would have a name like
run_demo_build.batWith your script created, you're now ready to upload your first build. Go ahead and double the newly created script. It should start a terminal where you'll see your build begin to analyze and upload. Once the upload is finished, you can inspect the results and close the terminal window.
Important Security Consideration
Note that pasting in a plain-text password is a security risk, especially if you include this script in your repo. You'll likely want to do that to use the script across the various machines you and your team work on. To maintain stronger security posture you can set up environment variables on your dev machine and substitute those into the script. How you do this depends on your OS and is generally out of scope for the walkthrough here, as is storing these credentials to automate deployments from a continuous deployment setup.
Publish and celebrate!
Once you've gone through all of that, this part is easy!
Go to the Builds tab under SteamPipe in your Dashboard and use the section highlighted in blue to set the build as live on your default branch.
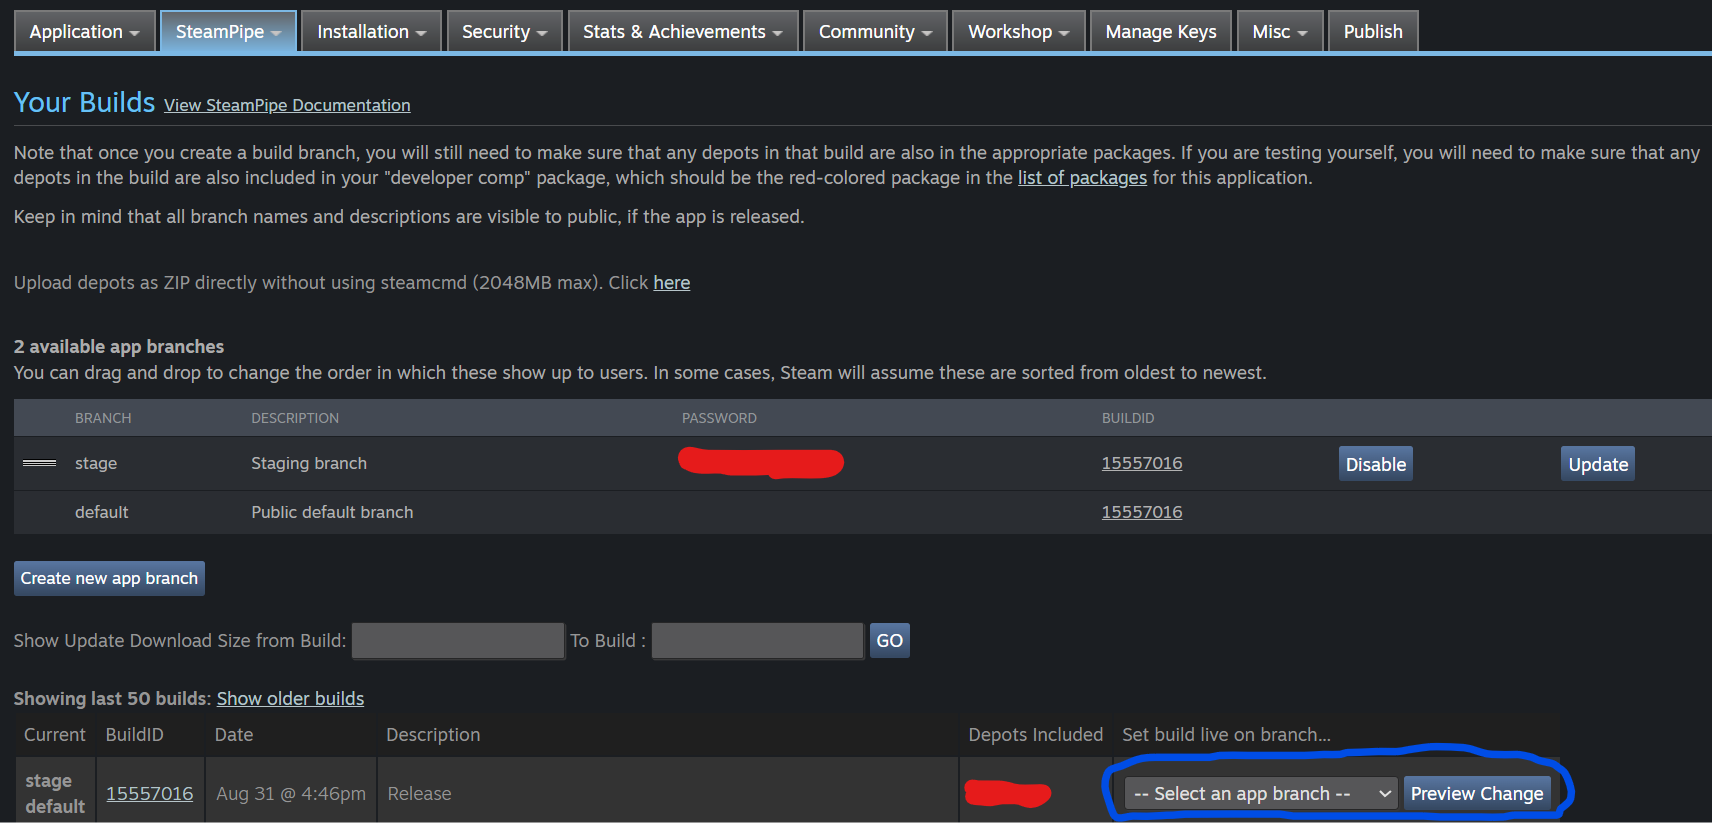
Note that when you first start, you will have only the single default branch. You can create many others, like I have here with the staging branch.
That's it! Your build is now live on Steam. Time to celebrate.
Find of the Week
Since we’re talking about Steam, this week’s Find of the Week is Robostreamer, a tool to automate streaming on Steam. In the pre-October 2024 Next Fest format, livestreaming was one more way to increase visibility for your game. You had nothing to lose and a small chance your game would be seen by a few more people which hopefully would convert to wishlisters.
Robostreamer comes in to automate streaming pre-recorded video. Nearly everyone used pre-recorded streams, and as far as I can tell they still do. Actual livestreams on Steam are quite rare in my experience. Especially since leaving this running during the entire Next Fest event was to your advantage, having a reliable service (at a surprisingly low price) to stream your pre-recorded videos is a must have. How important livestreams will be in the future iterations of Next Fest is anyone’s guess. If you’re interested in my thoughts on it, I did a video some time ago on my YouTube channel.
Affiliate Links
Use these affiliate links to support my work. There is no extra cost for you, and I receive a small commission if you make a purchase.
Fiverr - https://go.fiverr.com/visit/?bta=1055753&brand=fiverrmarketplace
Ovani Sound - https://ovanisound.com/discount/KYLEMMG?rs_ref=5pMzsiuF
Also with a built in 30% off Discount code on any of the Ovani Royalty Free Music packs! You pay less; I receive a commission. It’s a win, win.